Saturday 31 January 2015

Lots of little hearts

Earlier this week, I was absolutely delighted to receive a super bundle of craft goodies, for having won the January Charity Kit raffle over at the gorgeous blog Hope and Chances. If you aren't familiar with the blog, do pop over and have a look at it - especially if you want lots of inspiration for projects involving die cutting and embossing. There were lots of lovely products in my prize bundle including a set of D-Lites dies with a filigree heart and butterfly and tiny groups of hearts and butterflies.

For this card I've used just the hearts, cutting the group of hearts in each corner of the white layer so that the red behind shows through - and of course I now have a dozen tiny white hearts to use on another project!


I'm sharing this with:
Less is More where it's a Lucky Dip week with the theme Little Ones
Addicted to Stamps and More where the current challenge is CAS  

Wednesday 28 January 2015

A tag for a change

I used to make tags as if they were going out of business - I loved making them, but unless I could find a swap to take part in, they never actually got USED for anything so in time I lost interest. However this week the challenge at CD Sundays is to make a 6" x 3" tag, so I had to dust off that corner of my imagination and get tagging.

The backing paper and topper I used are snippets left over from a previous project, printed from the My Craft Studio "Flawless Florals & Sentiment Toppers" CD which I think came as a Create & Craft Club freebie a couple of years ago.

The bird cage is actually one panel of a box intended as a wedding favour - I've added a touch of sparkle by gently painting it all over with a product called Opal Dust which has lurked in my stash since before the invention of the wheel.

Tuesday 27 January 2015

Let's Pretend at Cardz 4 Guyz

This week the challenge at Cardz 4 Guys is "Let's Pretend" - we'd like to see a card suitable for a male, using any faux technique - for instance a faux wood, metal or leather effect, OR a card that involves dressing up, a game of "Let's pretend". .

I've used a faux leather effect I've been meaning to try for a while, since I saw it demonstrated on Create & Craft TV, and there is a video tutorial on the Crafters Companion blog. I really enjoyed making the "leather" background, which is made with heavyweight kraft card, some water/glycerine mixture and lots of scrunching, inking and embossing, but I have to say that now it's finished, it doesn't really look or feel as much like leather as I'd hoped it would. I think it's come out more like aged bronze. However I still love the look of it and it is perfect for a masculine card!

 
I am joining in with Let's Hear it for the Boys at Crafty Gals Corner
Anything Goes at The Pink Elephant

Monday 26 January 2015

A nice cup of tea

If you follow me on Facebook or Twitter, you'll already know how addicted to tea I am. So today's card won't come as much of a surprise! These tea-themed toppers from Crafty Individuals are perfect for a pretty, tea-themed card.

The lace is made with a Spellbinders die called "Adorning Squares". I cut the whole thing once, and then the complete inner square a second time,  then cut the two inner squares in half diagonally to create a set of corners. The two central circles went to embellish the strip with the sentiment on the card base. The beautiful pearl strips are from the Handcrafted Card Company - I won them in a competition on their Facebook page.

I wish you could feel the papers! They are from a pad from the Victoria and Albert museum - craft goodies p[op up in the most unexpected places, and claim to have a linen finish. The finish is, in fact, so soft and fabric like that you could sit and stroke them for hours. (Don't ask how I know that, I just DO, OK?)


I'm sharing this card with the Lace and Pearls challenge at the Allsorts Challenge Blog.

Second time lucky

Over at Less is More, this week's challenge is a sketch


My first attempt used some bits and pieces from my stash and followed the sketch quite closely, but I'm not happy with the result.....


Maybe I should have made the card smaller? Or used white card instead of kraft? Whatever the problem, it's turned out to be a case of "Less isn't quite enough". I think I'm going to attempt to rescue this card by stamping randomly over the background, using a small flower design and Versamark ink, and outlining the striped paper and sentiment in dark brown. It won't be CAS any more, but I think it will look more complete. If my rescue attempt works, I'll share it later in the week.

So, back to the drawing board, or in this case the stamping table. I found a selection of stamps, all of which had never seen ink and all of which worked pretty well together. I think the shell was a magazine freebie, not sure where the others came from, their origins are lost in the mists of time! I sponged several shades of blue ink from a Kaleidacolour pad into a masked rectangle on the white card and overstamped with the fish and as an added bonus I managed not to get any splodgy inky blobs anywhere else on the card!


So, this one is the card I'm going to submit to this week's challenge.

Orange Soup

This is one of those soups that gets cobbled together out of the odds and ends in the fridge and ends up being so delicious that you want to remember it so you can make it again in the future. And it looks pretty darned attractive too! The word orange in the title refers to the colour, although there is a subtle orange flavour to it too.

Ingredients (to serve 4-ish)

about 250g each of diced butternut squash, swede and carrot
1 medium onion, chopped
25g butter
1 tsp ground cumin
large pinch dried chilli flakes
juice of one orange (I'd have added the rind too if I hadn't already used it in something else)
salt
1 litre water

to serve: grated cheddar cheese and black pepper

Heat the butter in a large pan and fry the onion gently until soft. Then stir in the chopped vegetables, mix well, cover and turn the heat to very low. Leave the veg to sweat gently for 10-15 minutes.

Stir in the cumin and chilli and cook over medium heat for 1-2 minutes, then add the water and orange juice and bring to the boil. Simmer gently until all the veg are very tender - this will take 20-40 minutes depending on the tenderness of your swede. Allow to cool slightly.

Blend with a stick blender or liquidiser, then taste, season and reheat.


Sprinkle with grated cheese and black pepper to serve.

Print Friendly and PDF

Sunday 25 January 2015

Feeling blue...

Is there a point at which keeping crafty bits in case they come in useful actually becomes a hoarding problem? Naturally, I'm asking for a friend......

You see, when this friend saw that the current challenge at The Male Room is Shades of Blue, she decided to rummage through her snippets box to see if she had a few blue scraps. And this is what she found.....


After much sorting and pairing, she - oh, all right then, I - decided to only use a few of the snippets after all, so I'm going to be having the blues for a long time before I've worked my way through that little lot!

I decided on a CAS style, using the Clarity Stamps jeans pocket stamp. I wanted the pocket to be slightly raised, to make the tickets sit naturally inside it, but I didn't want the gap that would be created by foam pads or blobs of glue, so I stamped the pocket twice, and from one of the images cut away the top and middle, leaving just the raised border around the sides and bottom, and attached it to the back of the other pocket image.

That striped paper has been hanging around for years, I think it was from one of the very first QVC kits I bought, when my daughter was doing a school project about TV shopping - and she's 35 now! See, I KNEW it would come in handy one day! And the ticket and circle stamps were free cover stamps from old issues of Craft Stamper. I had to position the tickets carefully as they were for "Fairyland Park" and I thought if that showed on a man's card it might insinuate something unintended!

The stamped tickets could be replaced with real ones, tucked in to the gap at the top of the pocket, or maybe a folded up banknote as an interesting way of presenting a small gift.


I'm playing along at The Male Room - Shades of Blue  and also at Pixie's Crafty Workshop's Snippets Playground although when Di sees the pile of snippets that went back into my box she'll probably make me go and stand in the corner!

Friday 23 January 2015

This week's failures

I mentioned in my last post that I'd not been well, and I think some of my recent crafting attempts were done when I was rather feverish.... I can't think of any other reason for them now I'm looking at them from a cool, calm and collected point of view. So I thought, in the interests of honesty, that I'd share with you a couple of cards from the last few days that did NOT go as intended.

First of all this, which was meant to be fresh, cool, clean and simple. Whatever was I thinking of, using that vicious dayglo pink card? And what made me think it might be a decent colour to use with red?


I know we've had some gloomy days recently when there hasn't been much natural light, but this one really makes me go crosseyed and my teeth tingle!

And next, a card that was meant to be CAS - I stamped the rose design and embossed it with clear powder, then used cut and dry foam to create a resist design. All well and good - if rather untidy  for a CAS card - until I dropped a black ink pad face down on one side of the card! The mess it left was too big to cover up with a sentiment, so I had to trim half the front of the card away - which didn't leave enough white space for the card to be really CAS any more, and leaves the whole thing messy and cluttered.

 
So how about you? Have YOU had any disasters recently? Are you brave enough to share them? Come on, I've shown you mine......

Foiling on Acetate

I'm sorry things have been a little quiet on here recently - I've not been very well, and have had visitors from overseas, so almost all my recent posts have been ones that were scheduled some time ago. But at last I've got both the time and the inclination to start crafting again, so here is my first Foil Play DT post for 2015.

I've been playing around with acetate, and foiled die cuts look super on it - the shine of the foil coupled with the transparent acetate looks great. As well as your foils and acetate, you will need some double sided adhesive film.

Die cut your chosen shape from the film, keeping the backing paper in place on both sides. When you have cut the shape, remove the backing from one side and attach it to your acetate. If you are going to cut it out, as I have dome, this is the best time to do so. Also if you wish to colour your acetate, to give a stained glass effect, do it now. This looks good with black foil. Colour on the reverse, using glass paints or permanent markers. (To test whether your markers are permanent on acetate, write something on a piece of waste acetate, leave it for a while and then try to wipe it off. I found that Promarkers become permanent after about an hour, so don't try to rush this step.)

I've kept the cards made with my acetate butterflies very clean and simple, to show off the butterflies, but of course they could be incorporated into much more complex designs.

Instead of die cuts, you could create the same effect on acetate using double sided peel off outline stickers.


Tuesday 20 January 2015

Anything Goes at Cardz 4 Guyz

We've got an easy theme for you at Cardz 4 Guys this week - Anything Goes. Although don't forget it still has to be suitable for a man or boy!

Now I don't really associate my Glitter Girls embossing boards with masculine cards - when they used to appear together on TV, the Glitter Girls made everything very girly and sparkly. However Valentine's Day is only three weeks away so we're all on the lookout for ideas to make romantic cards to be sent to men. So I decided to try to make something masculine using the Mini Boox board. When I bought the board, it came with a pack of die cuts, some of which were vintage male designs, and I teamed these with some pearlescent copper card to make the hear shaped book card. I backed each of the pages with a cream heart, created with the board, to give the sender somewhere to write their greeting.

As the finished card is a non-standard size, I made a matching envelope from pearlescent paper and one of the remaining die cuts.


I'm joining in with
Twentieth Century Style at Make My Monday
Hats or Valentine at Crafting Musketeers
Love/Valentine at That Craft Place

Monday 19 January 2015

Love is like a butterfly..

... a rare and gentle thing. Does anybody remember that sitcom from the 1980s, with Wendy Craig as the harassed Mum of two teenagers? Every time I see the words "Love" and "Butterfly" together, I remember it and start humming the theme tune.

This set of stamps was free with a craft magazine last year - I can't remember which - and has never yet seen ink, even though it's such a gorgeous set of Indigo Blu designs. I'm not sure why I'd not used it before, I guess I'm just overwhelmed with Stuff and some things don't get their fair turn!

The background was made by brayering glossy card with a Kaleidacolour pad, and then stamped with the silhouette flowers. It's years since I made a brayered background, and I'm a bit out of practise, so there are a few streaks in the background, but hey, they look a bit like sunbeams!  The dragonflies are pretty metallic brads that I've had for years and tend to just get out and look at rather than actually use them!


I'm playing along with Mrs A's Butterfly Challenge - Butterflies and B is for Brads  and also this is my second entry to Darnell's NBUS challenge #3 .... I was going to do a third entry to her challenge, a CAS card to fit in with the NBUS challenge at CAS-ology, but oh dear, my card went oh so very very wrong..... I opened a brand new pack of Washi tape, only to find it was actually ribbon, and things just went downhill from there.....

Sunday 18 January 2015

Happy Birthday Karen

Today I'd like to share with you a birthday card I made for my friend Karen, whose birthday is today. Karen shares my love of entering competitions and in the days when I was producing Grape Vine, was one of the "elves" who helped me to find entry forms, so I personalised the card by making a topper using the free software at Tagxedo where you can create word clouds in your choice of shape and colour scheme.  The shape on the topper is supposed to be a lucky four leafed clover, although the colour scheme I have chosen doesn't really show that up too well.

Compers always need stamps and postcards, so I made the inside of the card with two pockets, then made some postcards, very simple ones so that they won't get caught in the Post Office sorting machinery, and tucked them into the pockets. Before sending the card, I added stamps to the postcards, but took the photos before adding them.

Happy Birthday Karen - I hope you like your card!


Tuesday 13 January 2015

Happy Birthday to Cardz 4 Guyz

The Cardz 4 Guyz blog is one year old this week, so to celebrate, our theme is Happy Birthday. Here is my DT card for the week.

I love the bicycle embellishment - it was sent to me in a RAK by a blogger I'd helped with a technical problem - and what little boy doesn't dream of getting a shiny new bike for his birthday?

Monday 12 January 2015

Little Foxes

I'd like to start with the news that for the second month in a row, Unstampabelles Challenge have chosen me as their DT favourite - something I could never have imagined when I first started this blog, as to me card making then meant stamping 99% of the time. But then I was encouraged by Lynn to take a look at the regular challenges on CD Sundays, and I gradually got more confident with using my CDs, which lead me to branch out into all kinds of non-stamped paper crafts.

Anyway, back to CD Sundays, where this week the challenge is Animal Antics. I was pleased when I saw the theme, as it gives me a good reason to use my lovely Design House Studios CDs. This twisted pyramid decoupage and the matching backing papers are from "The Lookout" series on the CD "Meadow's Edge 2 - The Next Generation" (that sounds awfully like a film title to me!). I've just scruffled, if that's a word, the edges of the paper and inked it a little bit, and made a daisy using Spellbinders dies. OK, I know those aren't daisy leaves, but they look pretty!  A nice simple card to bring a touch of spring to a gloomy January day.

I must admit I have mixed feelings about foxes; they are such destructive creatures and one of the few animals that kills for pleasure rather than out of necessity, and yet they are handsome creatures and fox cubs are some of the cutest animals there are!


Friday 9 January 2015

A Thank You card

This month the challenge at Unstampabelles is to make a Thank You card with a twist - the twist being what's outside your window.

Now what's outside MY window is quite famous - at least, it is in the world of garden bloggers, as it is the veg plot that my husband's popular blog, Mark's Veg Plot, is all about. And the first thing you can see from the window is always a watering can - strategically placed so that at the first sign of a wilting plant he can dash out through the patio door and administer first aid.

It's quite hard to think of a garden themed card without stamping, but thanks to a sheet of Kanban toppers that were lurking in my stash, a wooden watering can embellishment and a backing paper printed from the CD The Best of La Pashe 2014, I've come up with a card that pretty much sums up the view from my window.


Bombay Chicken with Red Split Lentils #RecipeClippings

Do you keep recipes clipped from magazines, labels, leaflets and newspapers? I've been doing it since my teens, and for many years I used to cut them all out individually and file them in those photo albums that used to be available, the ones with peel-back plastic pages. Eventually my pile of clippings reached unmanageable proportions and the books ceased to be available, so now they're all crammed into cardboard folders. But I have about a dozen photo albums filled with recipes, mostly from the late 1970s and early 1980s, and there are many recipes in them that I come back to time and time again.

One of them is called Bombay Chicken with Split Red Lentils. I can't remember which magazine it came from, but it looks as if it may have been Slimming Magazine as it gives the calorie count (only 320 calories) and fat units. It's very easy to make and produces a very hearty meal.


I served it with a selection of "English style" curry accompaniments - minted yoghurt, apples with raisins, bananas with peanuts, and tomatoes with red onions and cumin seeds.


And with some "Mock Pilau Rice"  made by frying a sliced onion, adding a little turmeric and stirring in leftover cooked rice and some frozen peas.


I'm joining in with the new challenge at Farmersgirl Kitchen   - #RecipeClippings

Soul sisters

When I was a little girl, I really wished I had a sister instead of a little brother, and envied all my friends who had sisters with whom they could swap makeup and share a copy of Jackie. But as I got older, I realised that some friends are just like sisters - the sort of friend who, when you are both old and infirm, is going to be the one who comes to visit you in the old folk's home with a bottle of illicit gin tucked up her knicker leg. Sisters in all but blood, everybody needs a soul sister!

That's why I love the message on this card. It's printed on acetate which I've stuck to white card and die cut. The sentiment, patterned papers, slide mount and all the embellishments are from one of the very first kits I ever bought from QVC - I can't remember exactly when it was, but in the folder where I keep it, there was also a mail order catalogue dated 1998. I don't part with things readily! Lime, orange and pink are rarely my first choice of colour scheme, which is probably why the papers have hung around for so long, but they do brighten up a dull January day.


I'm sharing this with
Ooh La La creations - Words to Inspire
Fan-tastic Tuesday - ATG with a splash of orange

Wednesday 7 January 2015

Malay-ish fried noodles

Credit Crunch Munch

Way back in the 1970s, when we were newly married, we lived in Brunei for a short time. I loved to find out about the local food and cooking, and bought a few recipe books published in Singapore, Malaysia and Indonesia. This noodle dish is one that I have evolved by picking out my favourite aspects of recipes in lots of different books from around the region and putting them together into a dish of my own.

I've listed the ingredients I used this time, but it's really a different dish every time as you can ring the changes with whatever you have to hand - replace the chicken with prawns, leave out the mushrooms or replace them with Chinese dried ones, add mange tout peas, spring onions or green beans, use different nuts or omit them completely, sprinkle fresh coriander over it - use whatever you have to hand and you'll still get a delicious dish with lots of different textures and flavours.

My recipe was intended to serve two, but would easily have served three adults or two adults and two children, making it an incredibly cheap dish - and far tastier than anything you could get from your local takeaway!
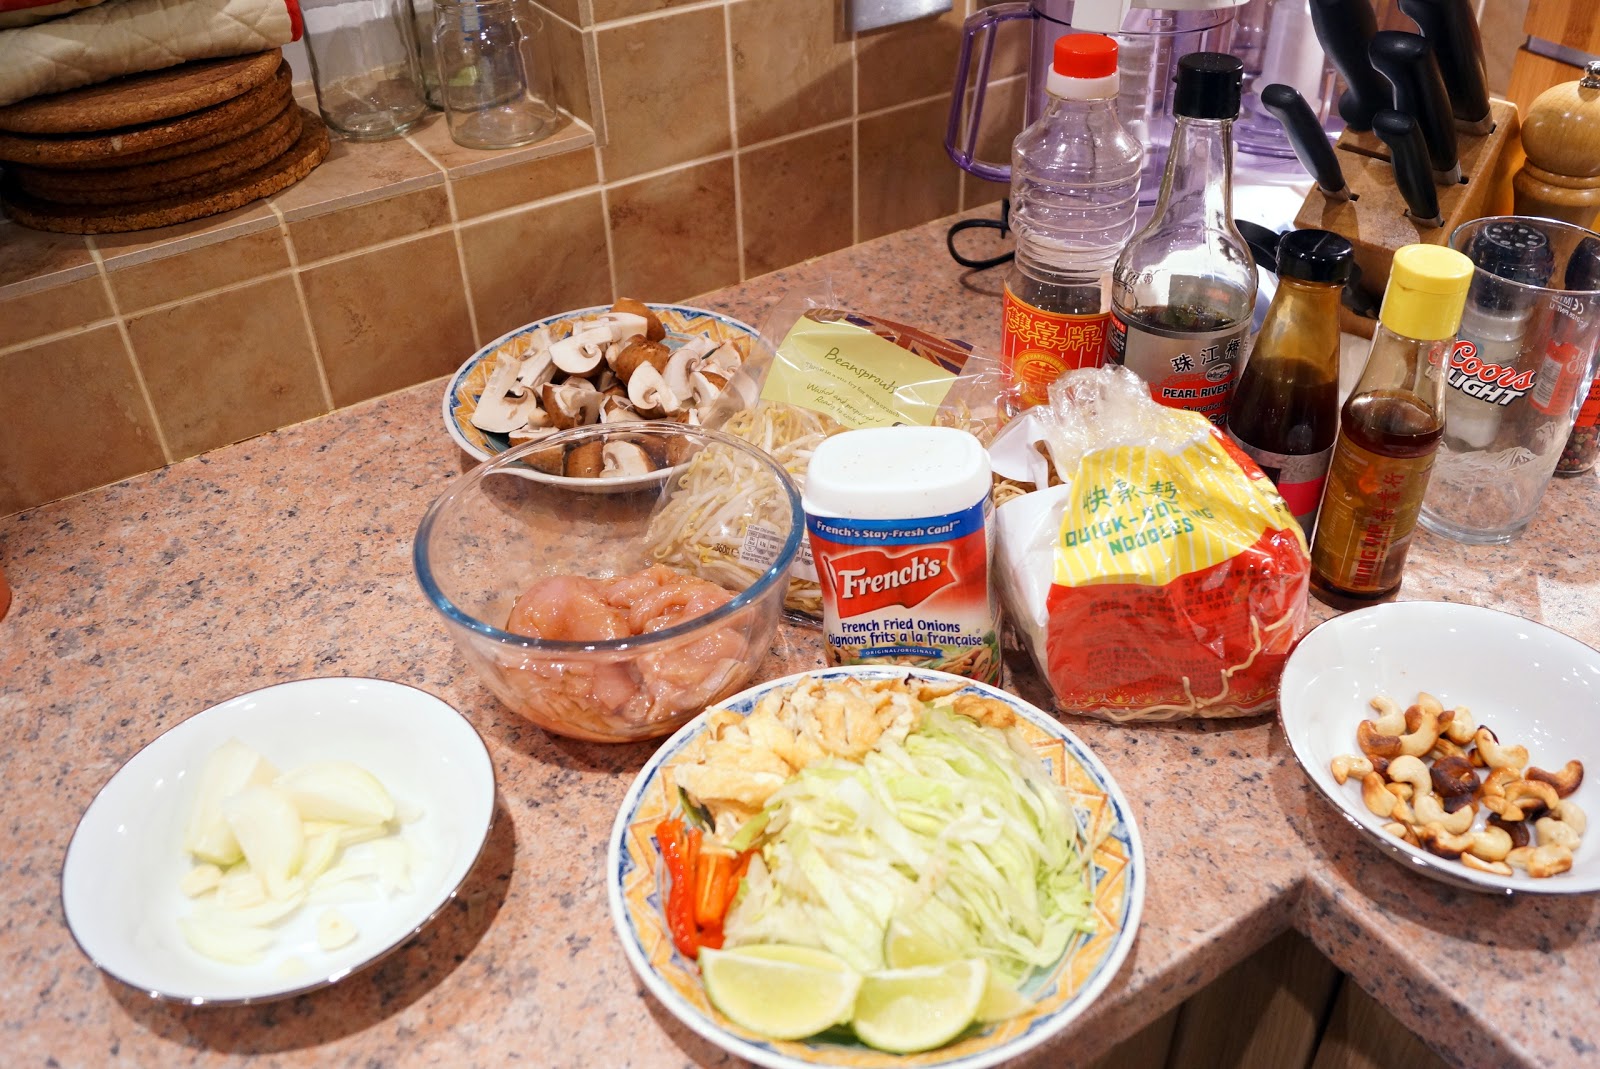


ingredients

a handful of raw cashew nuts
2 eggs, beaten
1 tbs sunflower oil

½ packet medium egg noodles
150g beansprouts

1 skinless chicken breast
1 tbs light soy sauce
1 tbs oyster sauce
few dashes sesame oil

1 small onion, finely sliced
1 clove garlic, very finely sliced
150g mushrooms, wiped and quartered
1 tbs Shao Hsing wine or dry sherry
1 tbs light soy sauce
1 tbs peanut or sunflower oil

A wedge of iceberg lettuce, shredded
1 red chilli, deseeded and cut into long slices
deep fried onion flakes, or use a handful from a pack eg French's
4 wedges of fresh lime

Heat 1tbs sunflower oil in a small frying pan and toss in the cashews. Stir them quickly until golden, then remove with a slotted spoon and set aside on kitchen paper, keeping the oil hot in the pan. DO NOT NIBBLE ALL THE NUTS! (always a danger in this house). Tip the egg into the pan and cook quickly to make a mini-omelette, flipping it over to brown on both sides. Turn out onto a plate and leave to cool then cut into small shreds. Set omelette and nuts aside.

Thinly slice the chicken breast and mix with the oyster sauce, sesame oil and 1 tbs soy sauce. Leave for a few minutes while preparing the noodles.

Cook the noodles as directed on the pack, adding the beansprouts to the water for the last 30 seconds of cooking. Drain and keep warm.

Heat the peanut or sunflower oil in a wok and stir fry the onion and garlic for 1-2 minutes until starting to soften, then add the chicken and stir  fry until no raw pink areas show. Throw in the mushrooms and continue stir frying until the chicken is cooked and the mushrooms starting to soften. Add the wine or sherry and allow to boil until the steam clears, then add the soy sauce and mix in the noodles and beansprouts.


Remove from heat and cover the top with shredded lettuce, then sprinkle over the chilli, shredded omelette, onion flakes and cashew nuts. Garnish with the lime wedges, to be squeezed over as you eat.


Because this dish is so cheap to make, and can be varied according to what you have available, I am sharing it with Credit Crunch Munch at Fuss Free Flavours and Fab Food 4 All.

Tuesday 6 January 2015

Vintage at Cardz 4 Guyz

The New Year has started at Cardz 4 Guyz,  and our first challenge of the year is Vintage. I always think Vintage is a good style for masculine cards, as the colours and aged metallic textures have  such a masculine feel about them. We'd love to see YOUR take on a vintage themed card for a male!

Do you find you get dozens of email newsletters from craft businesses that you have shopped with in the past? Yes, so do I, and although I don't want to unsubscribe from them, I generally delete them unread as they are all so tempting! However a few weeks ago I accidentally opened one from Crafty Individuals and saw a teaser for their latest collection of stamps - and I just couldn't stop myself from buying this super vintage transport tag collage stamp.

For this card I have stamped the entire image twice, cutting out the individual tags on the second image and making them into "proper" tags to layer over their counterparts on the original image. But I could also see the image working well as a stand alone one, or the tags themselves  used separately - I think this is a stamp you're going to spot on here many times in the future as I play with new ways of using it.

Santa brought me a "Photo Studio Box Light Lighting Cube Tent Kit" and I've been having a play with various ways of arranging the lighting for it, so I've added two photos of the card, identical apart from the arrangement of the lights. I'm not sure which I prefer - the first seems to capture the "feel" of the card better, while the second shows up the detail much more clearly. I think it will take a while before I've learned enough to get everything I want from a single photo!