Wednesday 28 September 2016

Bold with Gold

Today I have been playing about with all sorts of bits and pieces - my desk is a right mess now - and so far the nly finished item to emerge from it is this card - a one layer card, very CAS but using black for the "white space"


I stamped the sentiment, from a lovelt stamp set I recently won in the Playground, using versamark ink and then dusted it with a deep gold pigment powder. Then I used Imagination Crafts gold Sparkle medium to stencil three butterflies around it. I'm afraid I'm not very experienced with stencils yet - that one on the left has a rather smudged look to it!

I am sharing this with CAS on Sunday - One Layer. 

Tuesday 27 September 2016

Autumn Colours at Cardz 4 Guyz

Autumn is well under way now, so our latest challenge at Cardz 4 Guyz is Autumn Colours.

Here is my inspiration card for this week:


The delicate  leaf background is stamped using a background mat I've had ever since I started stamping - I can't recall where it came from. I brayered the mat with a Kaleidacolour Autumn leaves pad and then pressed a sheet of glossy photo paper over the mat. The sentiment stamped over it using Stazon ink is from a SU set I recently won in the playground.

The panel of stylised leaves is made with a stencil and Imagination Crafts Sparkle Medium - the camera is, as usual, lying and it actually has a wonderful raised texture and sparkle.

The leaf was die cut using a snippet of the beautiful card embedded with coffee grounds that I bought at the Eden Project some years ago with a little Alchemy Wax added to the leaf tips.

Everything is brought together on a background of ready-embossed Hunkydory card, again from my snippets box. As I've mentioned before about this card, it might be scorable but it isn't awfully cutting-friendly - with hindsight, I wish I'd added a little ink to all the edges after cutting it.

Monday 26 September 2016

Boingy boingy boing!

Every time I think of kangaroos, I think of the children's TV programme "Alphabet Zoo" that was popular when my girls were small, and included a song about a kangaroo that went "boingy boiny boing all over Austraaaaaaaaaalia!" So you'll have to forgive me for singing along as I type.

I've made this card for a friend who has a birthday later this week. She lived in Australia for several years and goes back there to visit as often as she can, so as she isn't going this year I thought an Australian themed birthday card might give her a little taste of the country.


The roos are cut with the lovely Australian Animals die set from Dies R Us. For the Uluru background, I searched on my ipad for a suitable photo and pinched it to the correct size for my card, then used an indelible pen to trace it onto acetate. Then I cut out the acetate and used it as a double mask,  first to cover the sky while colouring the rock with distress inks, then to colour the sky. I made the sun first by sponging ink through card with a circle punched from it,  then used the punched circle as a second mask while painting the sky using a waterbrush and two shades of blue from a kaleidacolour pad. The foreground is torn Core-dinations card.

I am sharing this with

Make my Monday - no patterned paper
Glitter and Sparkle - Happy Birthday  (it's their 4th birthday - why not pop over and help them celebrate?)
AAA Cards - masking

Toot-toot!

The current challenge at CD Sundays is "Things with wheels". Normally I would go straight to my La Pashe CDs for this theme, as they have so many super images from Teddies on bikes to crazy lorry drivers. But several of the DT have made fab cards with some of my favourite La Pashe designs, and anyway I wanted to have an excuse to browse through some of my other CDs.

Eventually I settled on this sweet topper and border from the CD "The Rachel Anne Miller Collection". I wasn't too keen on the backing papers designed to go with it, so I picked out a couple that had been magazine freebies - recently I went through  pile of old, unloved mags, ripped out the papers and stored them in a folder so I wouldn't feel obliged to always use them together, kit-style. For embellishments, I used cut some wheels using the X-cut Gears die set, going for a pastel yellow instead of the dark and metallic colours I usually choose, to give them a fresher, younger look. The sentiment is from Craftwork Cards.

Sunday 25 September 2016

The leaning tower of...... robins!

A few weeks ago I read one of the worst books I've ever read. I can't think why I bothered to read it, actually. It was a free download I got for my kindle, and I really ought to have deleted it rather than ploughing on to the bitter end. The subject was, of all things, an American cheerleading team who were learning to do a stunt that involved standing on each others' shoulders. The climax of the story was that on the day of the big event, the tower toppled and the woman on top fell off.

Anyway, while browsing some blogs or Pinterest for craft inspiration this week, I spotted a beautiful Christmas card that was a superbly masked heap of stamped robins, and somehow it set me thinking of the cheerleader book. What if, instead of being so perfectly packed, the robins were attempting the cheerleader stunt?

So, I got out the lovely Woodware robin stamp set that I won in the Playground (where I hope you are playing along this week - I'm head prefect for the week and you DO want to make me work as hard as possible, don't you?) and stamped a selection of the images into a very precariously balanced tower of robins, doodling in some "wobble marks" to make it look as if they are about to topple. The sentiment and holly leaves are from the same stamp set. The holly berries are some gorgeously blingy gems from Foil Play.


Today is September 25th - we are three quarters of the way to Christmas - and that makes it Rudolph Day at Scrappymo's. We have until the end of the month to link up a Christmas card in this fun challenge.
I am also linking up to
Crafty Hazelnut's Christmas Challenge - Use a sentiment
Fantasy Stampers - Watch the Birdie

Very old stash frame

A long, long time ago - I can't remember exactly when but about the time I first started reading craft blogs - I bought a couple of goodie bags from Craftwork Cards and among the items in them were some embossed die cut frames. I've never really been able to think what to do with them, as they are so big they dominate the front of a 15cm square card, so they've been loitering in my stash for years.

However the current challenge at CASology is Frame and I thought it would be a perfect opportunity to see if I could use one. I've added some simple stamping using a Uniko set called Flower Power #2.

Friday 23 September 2016

The witch of PMS!

September is drawing to a close, there's a definite nip in the air in the mornings - and it's time to start thinking ahead to making Halloween cards! As I don't celebrate Halloween, I try to make my cards dual purpose whenever possible. This one, for instance, while using traditional Halloween images of a witch and a cat, could be used for almost any occasion provided it was sent to somebody with a suitable sense of humour!


The witch is a free digi which I downloaded from Sweetly Scrapped and coloured with Promarkers.   The cat paper is a download from Coosty Creations  and the cat is cut with a die I got very recently and was absolutely SURE I would remember the brand name of...... #fail. The sentiment is one I computer generated and sized to fit my Spellbinders labels.

I am sharing this with

CRAFT - Autumn/Halloween/Thanksgiving
Addicted to stamps and more - Make your Mark 

White on White

I've been a very inconsistent blogger over the last couple of months, sometimes doing a torrent of posts and sometimes going for days with none at all. It's been that kind of a summer, we've been away a lot, and had a lot of fun at home with the grandchildren, but the younger of my nearby ones started school full-time yesterday so barring any crises, normal service has been resumed. I can blow the dust off my dies and wipe the cobwebs off my cardstock and get stuck into some steady crafting instead of the occasional grab-the-chance-while-you-can binge.

I very rarely make a white-on-white card - I love to see them at shows and demos but tend to forget all about them when I'm crafting at home. So I was pleased that the current Butterfly Challenge nudged me into making one.


The background is embossed with a crafters companion folder and the medallion is cut with a Spellbinders die set. I don't think it shows on the photo, but I've arranged the layers at alternating angles. I've used this die set many times before and only just noticed that some of the waste is obviously designed to be salvaged and used - those sweet little leaf sprigs that I've assembled into corners are waste from the largest medallion.

The butterfly is a Marianne Creatables die, a very old one from the days before holes in dies to poke the waste out were invented. Wax paper doesn't seem to help much with this die, but wiping it over with a tumble drier sheet before cutting makes it less of a chore to get all the waste out.


I am sharing this with

Butterfly Challenge - Wire and/or White on White
Glitter 'n' Sparkle - Anything Goes
Use Your Stuff - Butterflies

Tuesday 20 September 2016

Cars at Cardz 4 Guyz

This week it's my turn to choose the theme for Cardz 4 Guyz, and I've chosen Cars. Cars of any type, modern or vintage, racing cars or family cars - it's up to you, and I'm looking forward to seeing what you create.

For my own card, I stamped the retro Mini image using an old Linda Luckin stamp, then coloured and fussy cut it. The background is silver mirri embossed with the docrafts Galvanised Steel embossing folder, topped with a piece of chalkboard tape that has white lines like the centre of a road drawn along it using a white gel pen, and some striped washi tape. I went round and round in circles trying to get the stripes on the two bands of tape to run in opposite directions. I still can't see why it wasn't just a case of turning it upside down, but it didn't seem to work!

Some corrugated card for more texture and a bold sentiment from a Kanban die cut sheet were a restful way to finish the card after losing the Battle of The Washi Tape.

Monday 19 September 2016

RECIPE: Textures of tomatoes

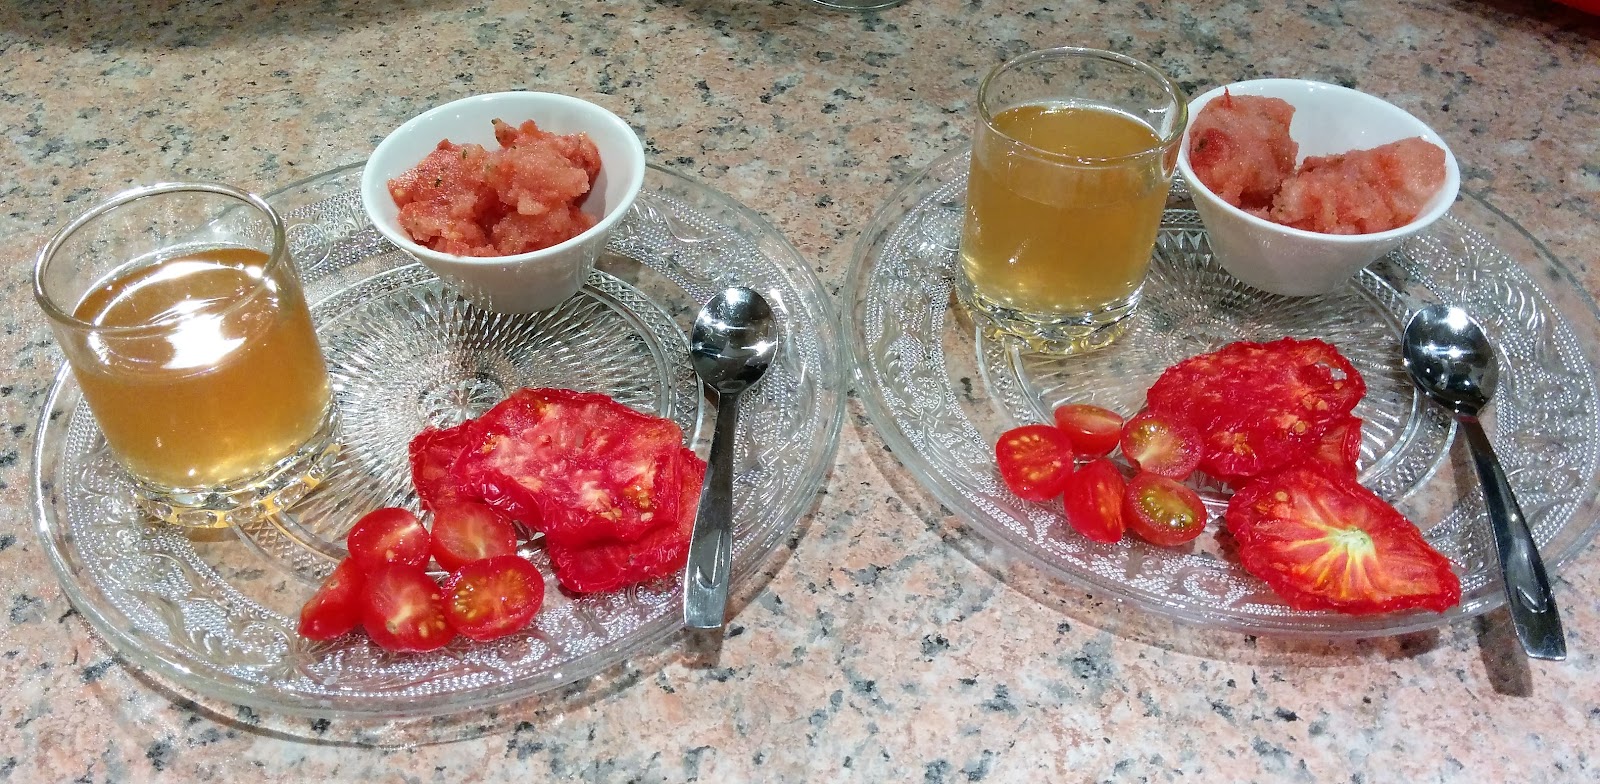
Last weekend it was our 39th wedding anniversary, and we decided to celebrate by making a special meal at home. I was in charge of the starter, and as we have a LOT of ripe tomatoes at the moment, decided to make it all tomato based.

So here we have: Fresh cherry tomatoes, semi dried tomato slices, tomato and thyme granita and tomato consommé.


The fresh tomatoes need no explanation. For the sliced tomatoes, I thinly sliced a tomato (slicing horizontally so the seeds stay attached, they don't drop out the way they do with a vertically sliced one) and then gave the slices 3 hours in the dehydrator, until they were soft and chewy.

For the tomato consommé I started a day in advance. This makes far more than two shot glasses worth, but it's so delicious you'll want more! The first time we tasted this was at the wonderful Rajvilas Hotel in Jaipur so it has very special memories for us.

You will need

1 kg very ripe tomatoes
2 torpedo shallots
a large handful of basil leaves
1 tsp Worcestershire sauce
a few drops of Tabasco sauce
seasoning

Roughly chop the tomatoes and shallots and place them in a blender  or food processor with the basil leaves and sauces. Blitz until finely chopped. Pour into a jelly bag, or a sieve lined with a muslin cloth (Oh, OK, I actually used a brand new J-cloth!) and allow to drain overnight.

The next day, pour the juice into a pan and bring to the boil. Simmer very gently for 15 minutes, then season,  chill again and serve very cold. You could, if you wished, add a slug of vodka - we didn't as we had a rather nice bottle of wine to drink.

Next the granita, which I have to say was rather less successful. I think if I make it again I will whisk a beaten egg white into it to bind it a bit - the tomato pulp and water seemed to separate too easily.  With that caveat, what I used was:

350g  tomatoes, skinned and roughly chopped
leaves from 3 sprigs of thyme
2 tsp red wine vinegar
½ tsp smoked sea salt

Place all ingredients in a food processor or blender and blend until smooth. Churn in an ice cream maker until frozen - if it starts to separate, switch off the machine and break up  the crystals with a fork. I found I had to do this several times. Store in the freezer, and before serving allow to soften slightly and once again break up the crystals with a fork.

a bit of upcycling

A few days ago I bought a couple of bottles of flavoured olive oil. They were delivered in a rather smart gift pack made from fine corrugated kraft card.

 
Notice how the divider between the bottles is made by cutting two little doors and pushing them inwards?

Well, push them outwards again and you have two ready-made doors to use on cards! I've used one of them to make this card - a brad makes the door handle, and when the door opens, the party boy is ready and waiting inside to greet his guests!


The image and sentiment are both from a sheet of stamps that came with a now-discontinued magazine a few years ago. I stamped the boy onto a separate piece of paper, rather than directly on to the card, partly to make sure he was properly lined up and partly because I wanted to colour him with Promarkers, which would have shown on the inside of the card. I've tried to make the shadows on his clothes look as they would if the door was casting a shadow.

I am sharing this with AAA Cards Game #73 - Upcycling 

Don't Panic!

If you're anything like me, you can't bear to throw away even the tiniest scraps of metallic card  - they just seem so precious - so your snippets box is full of tiny, tiny shiny things that seem to be too small to ever be any use, but are far too pretty to throw away.

All that changed when I got the Dies R Us die set, "Out of this world" which has a selection of space themed dies perfect for even tiny scraps, so I had to make a card to celebrate.


To make the "Milky Way" on the background, I used a white gel pen to make two curved dotted lines swoop across the card and then filled in the space in between with more dots. The planets, cosmic clourd and flying saucers are all cut with the dies. Interestingly, they are NOT embossed, the markings are made by the die making a sort-of half depth cut, an effect I've not seen before.

Now, if you are wondering why there's a book in the middle that says "Don't panic" on the cover, I'm not sure we can be friends any more. It is, of course, a reference to The Book from Hitchhikers Guide to the Galaxy, a series of books written by the late and much lamented Douglas Adams, which was serialised first for radio and then for television and later made into a film. Why is it mounted on a piece of silvery mesh effect fabric? Erm, because I found it in my stash and thought "I haven't used any of that for a long time". It doesn't serve any meaningful purpose except to make The Book stand out from the rest of the scene.

I am sharing this with
Mod Squad - sentiment as Main Focus
Pixie's Snippets Playground - week 247
The Male Room - Star Trek or any other Space series (H2G2)

Saturday 17 September 2016

A sparkly street

As I don't store or label my dies by manufacturer, it is a hue coincidence that I happen to have uses two dies from the same brand on this card. The dies are Memory Box ones - Happy Christmas and Colchester Houses. The background is some Cricut sparkly vinyl - and for a change, the sparkle actually DOES show in the photo!


I am sharing this with

CRAFT challenge - Christmas
Jingle Belles - at least one building
Winter Wonderland - at least two dies/add some sparkle

A very old deer

As I was die cutting this deer today, Mark looked over my shoulder and said "That must be a very old deer". That's because of the received wisdom that the size and number of points on a deer's antlers can tell you its age. Actually that isn't true, I've just been googling and although they do tend to get bigger every year for the first few years, they do eventually stop getting bigger, and for about half their lives, don't grow at all.

That's the educational bit out of the way! The die that triggered it all is a Crafts Too die called prance, and it's the first time I've used it. It's presumably supposed to be a Christmassy one, with a name like that, but I've used it in a non-festive way.


I am sharing this with CASology - Bark

Sisterhood of the Snarky Stampers Challenge 68: A is for AAAAARGH

It's almost Talk Like a Pirate Day, which is celebrated on September 19th, and Edna  has dressed up specially for the occasion! We'd love it if you would join me and the other sisters over at the Sisterhood of the Snarky Stampers and share your pirate themed creations, the snarkier the better!


For my card I have used a digi called Peg leg Pete from Dr Digis , coloured with Promarkers, and a computer generated sentiment torn, inked, distressed and curled a bit. The background is made by cutting the skull and crossbones from the X Cut Build a Scene Nautical die set into scrap card then using it as a stencil to dab white ink through. Although the ink is Stampin' Up Whisper White which is pretty opaque, it still came out pretty grey so I embossed the stamping with opaque white powder. I just happened to have a suitable charm to add as a finishing touch.
 

Friday 16 September 2016

Cupboard Love

... or to be more precise, fridge love. Anyone who has ever been owned by a cat will know what I'm talking about. You try to open the fridge silently - and all of a sudden there's a little pair of golden eyes looking up at you imploringly.....

So, for my second entry to Naughty or Nice Challenges Food and Drink themed challenge this month, I thought I would depict that undying love between a cat and a refrigerator. I cut a DL card to resemble a well known brand of fridge, and used peel off letters, in a very similar font to that the brand uses, to label the fridge "FOOD" in the place where the brand name normally goes. The door handle part is cut from a scrap of the peel off waste to make sure it matches.

The sentiment is a Dylusions stamp that I think sums up the situation perfectly, and the hungry cat is stamped with an image from the Katzelkraft "Chats Russes" set and coloured with Promarkers. Are you impressed with the cutting out? I reckon it looks almost as if I'd used a die!

 
I am also sharing this with Addicted to Stamps and More - Anything Goes

Wednesday 14 September 2016

Autumn toadstools

I love autumn - all my favourite colours can be seen all around, and so I couldn't resist buying the latest issue of Die Cutting Essentials where the cover gift is this lovely set of autumn leaf and sentiment ties. There's an embossing folder too - I've not used that yet.

I cut the dies in three colours of snippets, and then teamed them with a paper and image printed from Joanna Sheen's "The Country Diary of an Edwardian Lady" CD. For the sentiment, I stacked the three colors of die cut to give a lightly shadowed effect.


I am sharing this with

Cuttlebugmania - Anything Goes
Pixie's Snippets Playground - week 246
CD Sundays - Shades of Autumn
Fab 'n' Funky - Inspired by Nature   

Agapanthus by the sea

I love flowers and plants that have round heads - agapanthus, alliums, dandelion clocks and that thistley thing I can never remember the name of. So when Less is More asked us to make a one layer card showcasing our favourite flower this week, it was bound to be a round headed one, and I have a few stamps that fir the bill.

The one I decided to use is a Penny Black one I've had for about 5 years. It is called "Quite Dandy"  so I presume it is meant to be a cluster of dandelion clocks - but look at the leaves! Those aren't dandelion leaves! So for the purpose of this card, today it is being an agapanthus.

I've made a scene that reminds me of a recent holiday in Cornwall,  where so many of the shores and clifftops had swathes of agapanthus growing on them, and the beautiful blue heads looked stunning against the blues of the sea and sky. I chose a cream card blank rather than white, for a softer look, and made the background using watercolour pencils before stamping the grass, using a Linda Luckin stamp I got in 2008 (I know that as she only produced stamps for a few months, all that year) and finishing with my agapanthus/dandelion


I am sharing this with

Less is More - one layer, favourite flower
Retro Rubber - Anything Goes
Use your Stuff - colour challenge
  

Tuesday 13 September 2016

Balls at Cardz 4 Guyz

Oh, SHUT UP you - you know who you are!!!

Right, having had words with those who are tittering at the title, perhaps the rest of you will be sensible and join in with our challenge at Cardz 4 Guyz, which this week is Balls.

I've used an image and greeting from a Kanban die cut sheet and teamed them with a selection of masculine-looking Fancypants papers. I love the one taken from a vintage school reading book!


I am sharing this with Anything Goes at Ooh La La Creations

Harvest Mice

Yes, I know I've been AWOL - I've been away yet again. This time for another visit to my Mum, who was feeling very sad as one of her cats had to be put to sleep last week after being very badly mauled by a fox, and then on to my school reunion - it was 50 years ago that we all started at Ashton-in-Makerfield Grammar School. There was a great turnout and it was lovely to see so many old faces - some I had kept in touch with over the years and many I hadn't, but we all seemed to fit together just as we had in the old days, and what's more, our partners fitted in well and were made very welcome too.

Anyway, now I'm home and it's back to the crafting. For this card I've used a very old stamp from a company called Dimension Fourth - I can't find them online now so I presume they are no longer around. They used to have a monthly club where there was a different stamp set each month, and this stamp was in one of their sets. I stamped it with brown memento ink and coloured it with Promarkers and then - aaaaaargh - fussy cut it. All those tails and stalks! I sponged a background and stamped a sentiment onto a card blank and then used Pinflair glue to slightly raise the image above the card.


I am sharing this with Make My Monday - Autumn Colours
And also with a brand new challenge I would like to introduce to you - Perfectly Created Chaos where the first challenge has just started and is called Stamp it! Anything Goes as long as some stamp-and-ink (not digi) stamping is included. I know from my own experience the excitement of starting a challenge and waiting for the entries to flood in - and, until word gets around, it doesn't happen, so please pop over there, join in, spread the word and give Dori some love!

Thursday 8 September 2016

Autumn Sunset

Yesterday I spent another day crafting with my granddaughter - she wanted to have a go at some mixed media projects and had great fun, although I forgot to take any photos of her finished work. But as part of it, she asked me to show her how to make a blended inky background to stamp on, and this is what I made to demonstrate.


The background is made from distress inks in shades of red, orange and yellow, blended together then overstamped with a dragonfly in one of the shades of red. The remaining stamping uses black Stazon - a Paper Artsy sentiment and a selection of wild flower stamps from an old Artylicious set.

I am sharing this with
Fab'n'Funky - Fall Colours
Mod Squad - Fall Colours   (I've not used any of the greens on the palette - hope that is OK)

Happy Birthday Fiona

Yesterday was my daughter Fiona's birthday, and I made her card using some of the Katzelkraft stamps that she bought me earlier this year.


First I stamped the cat, and then masked it and stamped the water over the top. Then with the mask still in place I created a "mock bokeh" effect by using a very small round blending sponge and several shades of blue and grey ink. How hard you dab the sponge on the paper determines not only the intensity of the colour, but also the diameter of the circle. The cat is coloured in with Promarkers. Various papers from my stash formed the layers, with a sentiment that I think sums all cats up perfectly, from a Dylusions set. The clouds are die cut using a die from the docrafts X-cut "New Baby Icons" set, with a little grey added with Promarkers.

I am sharing this with
Cuttlebugmania - Anything Goes
Show Us Your Pussies - Furrything Goes
Loves to Craft - Anything Goes
Little Red Wagon - Fur-ever friends
 

Tuesday 6 September 2016

Harvest Home

What - ANOTHER post from me? Yes, my feast-or-famine phase continues, as over the last few weeks I rarely seem to be in the same place as my computer or, indeed, my craft supplies. The current plan is that things should return to normal by the middle of next week - but I've whispered that very quietly so as not to tempt fate.

Anyway, my final post for today is to share with you a very quick and CAS card made for the Harvest challenge at Addicted to Clean and Simple.


The corn-ear medallion stamp is one of the very old club stamps from Dimension Fourth who are sadly no longer in business. I stamped it with an equally old Marvy inkpad, which still seems as juicy as the day I bought it, then used a glue pen and glitter to add sparkle to the grains of corn.

The sentiment is from the John Lockwood "Snowdrop elements" stamp set from Creative Expressions.

Crafting with kids - foiling

Although many children are already back at school, my 7 year old granddaughter Lara has another week to go, and as Mummy and Daddy are back at work and Holiday Club has finished for the summer, she's spending a bit of time with us this week.

Yesterday was a damp, muggy day and none of us really felt like getting out and about, so she and I had a crafting day together. I remembered that she and I hadn't done any foiling together for a long time, so I lifted out an assortment of coloured foils from Foilplay and some double sided peel offs from an old batch I bought from QVC years ago.

Lara designed and made this card all by herself. The peel offs, being old, weren't quite as sticky as they used to be, so I showed her how to carefully rub around the edges with a ball ended scoring tool to make sure the foil stuck right up to the edge. She said it reminded her of the brass rubbing she had done while away on holiday!

For the sentiment, she used a Tonertex pen to write the words (I supervised her while using the pen as the fumes are pretty potent) and then rubbed the writing with rainbow foil.

The layout is all her own work - even the idea of creating a butterfly from heart shaped peel offs.


And here is the proud artist with her finished card

Peacock time again

I had to laugh when I saw the new challenge at Less is More, use the colours in a peacock's tail, because only the day before I'd posted this card which would have been perfect for the challenge.

While I could still remember which of the inks from my Kaleidacolour pads I had used to make the die cut peacock, I dug them out again and this time blobbed them randomly all over a piece of semi-matte photo paper to give a much more intense colour. Than I stamped the art nouveau style peacock's tail feather stamp from a very old Tandastamps set over the background using black Stazon ink and cut out the images.

I had just bought this gorgeous ribbon from a Facebook page called Its sew Gorgeous and was waiting for a chance to use it - and it is perfect for this challenge! I added a stamped sentiment using a stamp from a set that came with a recent issue of Creative Stamping.


I am also sharing this with

Glitter and Sparkle - CAS 
Addicted to Stamps and More - CAS

Pickled Cucamelons - you asked for it!

When my children were little, we had a family mantra - "You asked for it, you eat it!"

Well, so many of you asked for more info about my pickled cucamelons, I really think you all ought to come around  eat them.

Fist of all, what is a cucamelon? Well, I've seen them online described as being like a tiny watermelon that tastes like a cucumber. They grow on a vine, and are about the size and shape of a large green grape. Mark grew some for the first time this year and despite negative reviews we'd read (and heard from my brother, who grew them last year) we were looking forward to trying them.

Well, we were very disappointed. The skins are quite tough, and the insides don't have very much flavour but what there is is like a rather bitter cucumber. However I was told that they were pleasant when pickled like gherkins, and as I love gherkins I decided to give them a try.

I had enough to fill a  450g peanut butter jar, and I wet brined them by soaking them overnight in a solution of 75g salt in 500ml of water, thin drained and rinsed them and packed them into the jar. Because I was only making one jar, I used some bought ready-spiced pickling vinegar to fill the jar and then left them in a cool dark cupboard for a couple of weeks.

I've just had the official tasting. They taste of....... vinegar. Nothing else.


However they look quite pretty. If I had the sort of kitchen that displayed pretty jars of sparkling, never-to-be-used ingredients instead  of having cupboards crammed with grubby plastic bags with hastily scrawled labels, I might make more of them just for the look of them!

One sketch, two cards

The sketch at 52 Christmas Card Throwdown this week is so good, I used it twice! And in two completely different ways, too.

Here is the sketch:

 
For my first card, I stamped the Lili of the Valley Reindeer Trio and coloured them to match the backing papers, which were from an old issue of Making Cards but were originally designed by Polkadoodles. Them I made the card up as an A5 sized easel card. The frame around the central image is made using a double sided sticker covered with glitter. (Oh, a lightbulb moment, I could make more of these using my own does and some double sided adhesive sheet!)


As well as 52 CCT , I am submitting this to the Lili of the Valley September Challenge which is Animals, and to Winter Wonderland, where the current challenge is Cute Characters or an easel card - I reckon this is a double whammy!  
 
A complete change of pace for my second card, which has a vintage/shabby chic look to it. The central image is a Kanban one and the two small images are reproduction cigarette cards, all from Foil Play.  I've added doileys, ribbon and lace and layers of card from my Christmas snippets box, plus a stamped image (it's an old unmounted stamp I was sent in a RAK).
 
 
The images and card blank were roughly edged with gold ink and embossed with gold ep, the edges of the card distressed with the v shaped thingumagig from a distressing kit and the sentiment edged by scribbling roughly with a Tonertex pen and cold-foiling, using foil from Foilplay.
 
As well as 52 CCT I am sharing this with
Cardz 4 Galz - Lovely Lace 
Christmas Card Challenges - Shabby Chic or Monochromatic 
Crafty Hazelnut's Christmas Challenge - Vintage    

Congratulations at Cardz 4 Guyz

It's time for our new challenge at Cardz 4 Guyz, and this week our theme is Congratulations.

I've decided to make a graduation card. Back in my days of learning, only University graduates had graduation ceremonies, but nowadays they seem to be held for every academic step - my four year old granddaughter has just had one, complete with mortar board and scroll, because she is leaving nursery for primary school! So there are far more opportunities to send graduation cards.

I've used decoupage and a sentiment from the CD The Best of La Pashe 2014 along with some woodgrain effect backing paper and black card, to represent an old fashioned school blackboard, a "school ruler" cut from a sheet of Fancy Pants paper and a scroll made by tightly wrapping a piece of parchment around a pencil.


 I am sharing this with
Allsorts Challenge - New Beginnings as every graduation marks moving on to a new stage in life
Crafting Musketeers - Back to school
Make My Monday - Back to school
  

Sunday 4 September 2016

Saved by the Snippets!

This card was never intended to be a snippets card! It started out as a square one layer card, stamped with lots of ferns in greens and autumn shades, to be entered into this week's Mod Squad challenge which is Foliage.

The ferns were done and I went to stamp a sentiment on the top right of the card and........ disaster! I dropped a dark green inkpad - PLOP! - face down on top of the card. There was a HUGE gash of green across the top.

I was just about to throw the whole thing away when I realised that if I cut it partway up to make an A6 landscape card with a side fold, the ferns would all still be intact and there would be only a tiny bit of the green splodge showing. And a quick rummage in my snippets box provided just the right snippets to stamp the sentiment and layer it up to cover the splodge.

So I am also joining in with the latest Snippets Playground challenge, with my new motto - SNIPPETS SAVE CARDS!

Back in Time

This month's challenge at One Layer Simplicity is "Back in Time"  - either time themed or vintage.
I combined both by masking off a wide border to the bottom and left of my card front and stamping the pocket watch image (I'm not sure whether this is a Studio G stamp or a Craft Stamper freebie) then masking the watch off  and stamping over it with the Time word collage (an old Raindrops on Roses stamp) and the stipple pattern from The Gentleman Crafter's stamp set, and finishing with a light sponging of the lighter green ink.

Around the world in a handful of stamps

I made this card to showcase the lovely set of travel themed stamps I picked up from a bargain bucket at the Farnborough show in the spring. No brand name on the pack and I think it only cost £1,  but I love, love, LOVE them! Here I've stamped them in dark green and sponged with a lighter green to give them an aged appearance. Although the London Eye and the Sydney Opera House and Harbour Bridge are pretty modern so maybe the vintage look is a bit out of place. But I like it.


I chose the London, Sydney and San Francisco images along with the tiny postcards for this card, along with a sentiment printed out from Debbie Moore's "Vintage discovery" CD. The background paper is from an old K&Company pad, it is a map of the North American continent. I'm not sure why I decided to stencil a stone wall over part of it - I think somewhere in the back of my mind I must have been subconsciously thinking of The Great Wall of China, just to add another continent into the mix!

I am sharing this with
Country View Crafts - Travel
Stamping Sensations - one for the boys
Just Us Girls - Travel 


Saturday 3 September 2016

Sisterhood of Snarky Stampers Challenge 67 - C is for Caffeine

It's time for the new challenge at the Sisterhood of Snarky Stampers  and today Edna is buzzing, because the topic she has chosen for us is C is for Caffeine.


Being more of a tea drinker myself, I don't have much in the way of coffee related stash, in fact until the recent craft day in Frimley I had none at all, but luckily the goody bag we were given on the day included a coffee-bean stencil. I stamped the words using individual letters from the stamps I am "looking after" for my daughter, scribbled round them with a coffee coloured pencil and cut them out.


If you are in the UK, the colour scheme is probably self explanatory, but for those who live elsewhere here's why I chose it. There is a chain of coffee shops called Costa which has a branch on practically every high street, and their crimson cardboard cups are an important part of many people's day. So this card is a tribute to all of my friends whose journeys are planned around where they can find the next branch of Costa.