Sunday 30 October 2016

Karma Chameleon


Another CAS card today - this time stamped using a lizard from a Woodware set, called In The Jungle, and a sentiment from Rubber Dance. I've used scraps of card to match the chameleon for my background layer.

I'm sharing this with
The Male Room - Orange, Blue and Yellow
Sweet Stampin' - Inspired by a book, film or song (Karma Chameleon, of course!)

You'll be relieved to know that's my final post for today...... well, the final one I'm publishing today anyway.   I still have a couple to schedule, my poor keyboard is going to wear out.

Getting Fizzical

This week there are celebrations at Less is More - they are celebrations their 300th  week, so of course the theme is Celebrations and Festivals. When I started my blog, I'd never heard the term CAS or realised that it was a recognised style, so I've learned a tremendous amount from Less is More over the last few years.


What could be more suitable for a celebration than a glass of champagne? I've used a magazine freebie die to cut a glass from some champagne-gold card, and also used the same card as a background. I stamped the sentiment (another magazine freebie) and then cut the top layer diagonally and trimmed a little off the bottom edge of the upper part, which I then embossed with the old favourite Cuttlebug swirls folder. To top it with the stamped and embossed layers, I sanded as much of the glitter as I could off the areas of gold that wouldn't show and stuck the layers on with lots of extra high tack adhesive tape.

And now I'll raise MY glass to Less is More - here's to many more of your inspiring challenges!

Use it or lose it

The craft clearout I started at the beginning of the year went really well for a few months, but inevitably it fizzled out long before I finished. While I was looking for some gold glitter card (for use in another post you'll see later on today) I stumbled on a massive 600 page 12 x 12 paper pad, not the kind of though you'd overlook, really, that I've not even flicked idly through for absolutely ages. Most of the papers in it are Just Not My Thing and the ones that ARE my style have long since been used.

So before I slip the rest of the pad into the grandchildren's craft box, I thought I would see what I could do with some of the papers. For this card, I've used 3 co-ordinating sheets, one as the main background, one with the sentiment stamped on it and the third with the floral elements fussy cut to use as embellishments. I finished it off with a few pearls and a bow.


I'm sharing this with Alphabet Challenge Blog - R for recipe - my ingredients are stamped sentiment, flowers, ribbon and pearls
Just us Girls - Sentiment as focal point
 

All those little white bits......

You know the ones I mean? You use some white card, and there's a little bit left, so you keep it, but it's not big enough for the next thing you need so you start another piece, and then there's a bit of THAT left too.... and so on and so on. And white, well, there's always a use for it isn't there? So you don't throw away even the tiny pieces.

I don't know about you but I've ended up with TWO snippets boxes, one of various coloured and patterned paper and card, and the other just for neutrals - black, white, cream, kraft, silver and gold. But the neutral one was overflowing and it was time to take drastic action!

Then I spotted an article in a recent issue of Quick Cards Made Easy, featuring the die that had been the covermount that month. It used some pretty BoBunny papers, most of which I had odds and ends of among my snippets, plus loads and loads of white die cuts. So, very unusually for me, I set to and made almost exact replicas of all the cards in the feature. I say almost, because not having full sheets of any of the papers, I had to chop and change a bit but as they are all part of a set and designed to work together, the general idea is still the same.

And I cleared out a HUGE pile of white scraps with all those die cuts.


It was really very relaxing copying the pictures and layouts in the magazine rather than creating them for myself, it reminded me of when I used to knit and cross stitch, always following a pattern.

I am sharing the bottom card with Craft Rocket Challenges - Pretty Pinks and I'm heading over to the Snippets Playground to share the whole lot!

Saturday 29 October 2016

Red and Gold

I've kept to just two colours, red and gold, for today's Christmas card, although there is a tiny bit of green on the holly sprig on the banner.


I used a Clarity Stamps stencil, stencilling Imagination Crafts Sparkle Medium in Gold Shine  directly onto the card. The die cut swirl is a Spellbinders one and the stamp I used for the banner is from the Papermania Folk Art Christmas range.

I am sharing this with

Little red Wagon - Stencil it
Crafty Hazelnut's Christmas Challenge - Anything Goes
Allsorts Challenge - Let's Make a Start on Christmas   

Sisterhood of the Snarky Stampers challenge #71 - Watercolo(u)r

Edna's looking a bit watery this fortnight!


That's because our challenge at the Sisterhood of Snarky Stampers is W for Watercolo(u)r.

Now I'm not very skilled with a paintbrush, so I've used watercolour pencils and a waterbrush for my effort. I painted the image, then printed him again onto thin copy paper and cut it out to use as a mask while I stamped the sentiment around him.


I've been wanting to give Weekend Walter, from Dr Digis, this treatment ever since I got this brilliant sentiment stamp from Rubber Dance. I mean, just look at him  standing there in his pulling pants! Isn't he just sex on a stick? You totally WOULD, wouldn't you? And what's more, he knows you would!

Now it's confession time. No, I'm not going to 'fess up about me and Walter, that's a private thing!

Confession 1 - the first time around this went totally wrong. I ran watercolour paper through the printer thinking that if I left it overnight the image would dry completely and the ink wouldn't run. I was so, so wrong. So it's printed on ordinary 200gsm printer paper and then painted, which of course puckers it so it has to be left under a pile of books to flatten.

Confession 2 - see that torn edge - that was NOT part of the original plan. But not being a painter, I got so bored with painting the background that I sort of fizzled out partway to the edge. So I tore it down to where I'd painted and then had to dig around to find something to make a background with, hence the corrugated card. I think it works because it makes you want to run your fingers over it (You all DO do that with corrugated card, don't you? With the backs of your nails to make that clunkety clunkety sound? It's not just me is it?) in much the same way as you want to run your fingers over Walter's, er, rippling torso.

Anyway, enough of the confessions, now it's YOUR turn to grab your paintbrush, put your snarky hat on and share your results with us at the Sisterhood, where you may  be crowned Queen or Princess of Snark!

I'm sharing this card with Crafty Creations Challenges - Watercolour

Friday 28 October 2016

Die cut bats without a bat die

At this time of year there's rather more need for bats in our crafting than the rest of the year round. As I have often said, I'm not a big fan of Halloween and don't have mush Halloween related stash, so when I need a die cut bat, I use my trusty old Cuttlebug butterfly die to cut a butterfly and then cut the lower wings off  and trim the edges of the upper ones to leave a bat-like shape. I've used three, cut in pink pearlescent card, on this card.


That lovely cobwebby background is a scrap of hand made paper I was sent in a RAK many years ago and has been just lying around waiting for the right moment to use it. For the coffin, I cut a large tag shape and then tapered the lower sides. The "Expired" bar code on it is a sentiment stamp from Rubber Dance.

I am sharing this with
Cuttlebugmania - Spooky
Fab 'n'Funky - Celebrate Halloween
Mod Squad - Halloween Fun
Cut it Up challenge - Halloween in non-traditional colours   

Thursday 27 October 2016

Yet more falling leaves

I can't get enough of autumn colours, and you can tell that by a quick look at my craft stash. Many of my favourite and most frequently used stamps are autumn themed, like the one I have used here. It's a Rubber Stampede stamp and I'm not sure just how long I've had it - at least 10 years and probably nearer to 15. It's still one of my favourites and is becoming a firm favourite with the grandchildren too.


Today I've coloured it with Promarkers and the backing paper is from the DCWV Stack 9 12x12 pad. The leaf embellishments are Tando die cuts, coloured with Imagination Crafts Starlights paints - they are left over from a card I made last week. I'd actually made a stamped and coloured shrink plastic embellishment, but I'd forgotten how much the colour changes during shrinking so that's been set aside to use on a future project.

I am sharing this with

Addicted to Stamps and More - Make your mark
Retro Rubber - Fall Colours

A Double Easel Card

One of my favourite card folds is the double easel - it is so very easy to do and yet looks as if it took hours of measuring, cutting and folding. For this one I took an A 4 sheet of card, folded it in half, then cut the front right across at the same height as the width of the card and folded the large square panel diagonally and the small rectangular one in half. A scoring board makes the whole job a matter of minutes. Finding a suitable angle for the photos takes a lot longer.....


The paper and toppers were printed from an old Sharon Duncan CD called Beautiful Butterflies.

I am sharing this with Mrs A's Butterfly Challenge - Harebell and/or Hoops - sorry, I couldn't really incorporate any hoops into this unless those lovely kaleidoscope patterns behind the butterfly count!
Crafty Gals Corner - Anything Goes 

Tuesday 25 October 2016

Going Green

I've been on a bit of a crafting roll today - well, CAS cards can be very quick to make if you've already got them planned in your mind!

For this card, I've used a Studio G  stamp set that I've had for a couple of years and has only seen ink once before - thank you very much to Shopping Our Stash for picking Three or More Trees as this week's theme and reminding me to dig it out.


I stamped the leaf trail repeatedly around the edge to form a border, leaving a space for the sentiment. The main image is layered onto two scraps of green card from my stash, and the darkest layer, which is actually dark green and not black as it appears in the photo, is cut from a rather nice green-and-gold envelope that I couldn't bear to throw away. Look out for the gold bits in a future make!

Dapper Gent

Here is a very quick and CAS card that I made for the latest challenge at AAA cards - Masculine.


The specs and 'tache are stamped with Versafine ink that always seems to give a proper BLACK black, if you know what I mean. The stamp itself came from a magazine cover mount a few years ago, I think. I've added some googly eyes, washi tape and a sentiment made using a hand held Dymo labelling machine.

Snowman and Santa Selfie

It's Rudolph Day at Scrappymo's where from the 25th to the end of every month we have a chance to share a Christmas card - and if that makes you shrug and think that Christmas is ages away, let me remind you that it is just two months away today!!!

I've used this super fun digi from Dr Digis, called "Selfie Santa" and coloured it in with Promarkers. I thought up the sentiment to go with it and created it on the computer. The papers are from a DCWV 12 x 12 pad simply called "Stack 9".


I am also sharing this with
Christmas Card Challenges - Anything Goes
Crafty Hazelnut's Christmas Challenge - Use a sentiment
CRAFT challenge - Christmas  

Cards with Movement at Cardz 4 Guyz

Today for the latest challenge at Cardz 4 Guyz we would like to see cards with movement. It might be a slider card, or a spinner card, or any kind of kinetic card.

I chose to make a magic window card (and I wouldn't be giving too much away if I were to say that I'm not the only member of the DT to have done so!). The finished card has an uncoloured image:


But pull the tab and - hey presto! - the image is coloured in!!!


The instructions that I used were printed off from an email I received back in 1999 and have been meaning to try ever since.... and they didn't work. So I ended up spending an afternoon watching You Tube videos to try to understand exactly what gets stuck to what, and where it gets stuck. It's worth it, though, for the impressive result, and I'm crossing my fingers that one of my teamies will have provided a link to some easier-to-understand instructions.

The main image stamp is by Crafty Individuals, the cogs and gears are various stamps from my stash and the background card is covered with pieces torn from a sheet of tissue printed with vintage advertisements.

I am sharing this with
Craft Your Passion - Anything Goes 
Use Your Stuff - Heritage  -  because of the vintage balloon image and the vintage advertising paper

Monday 24 October 2016

Tiny Tots at Ooh La La Creations

Our new challenge is waiting for you at Ooh La La Creations Challenge and the theme is Tiny Tots.

For my card I have used papers from the Shawn Jenkins Collection CD, which is available in the Ooh La La Creations Shop. I love all the cute little creatures in the picture - every time I look at it I find another detail to smile about. The die cuts I have added are cut with the X-cut "Baby icons" set.

Sunday 23 October 2016

A Snippety Halloween

I really wasn't intending to make any more Halloween cards, but the photo challenge at Just Us Girls this week was one I just couldn't resist.

 
Here's my take on it.....


I have no pumpkin die, so I used the smallest die from a Nestabilities Ovals set to cut 5 ovals  and stick them together to form one, with a tiny scrap of green for a stalk. The trailing "vine" is an ivy sprig cut with an old (Marianne, I think)  die and the cat is cut with the Dee's Distinctively Dies set "Retro Cats 2". The tiny pumpkins are confetti that fell out of the packaging of something I bought on ebay recently!

All the die cuts are done with Snippets, so I'm taking this card into Pixie's Snippets Playground with me.

And I'm also playing along with the Spooky challenge at Cuttlebugmania -  although I find black cats cuddly and pumpkins delicious, at this time of year they are both allowed to be spooky.

Saturday 22 October 2016

Winter village

Thee's a recipe challenge this week at Less is More, the recipe being to use Acetate or Vellum. I think it's going to be a very popular one - there are some wonderful cards in the gallery already.

Here's my take on the challenge:


I used a die from the X-cut Village Build-a-Scene set to cut across the front of  a white card. Then I cut straight across the front 1cm from the top and replaced the front of the card with a square of acetate, placing the lower, die cut, area of the card back in position after adding a stamped sentiment. I used a peel off marker pen to colour the windows yellow from behind, and covered the whole of the inside of the card with dark blue paper.

I had planned to add the silver star to the inside of the card, but when I tried it, it looked better on the outside. There's a hint of sparkle to the acetate too - that isn't really meant to be there, I put the acetate down somewhere I'd been using glitter and the static on the surface picked it up, but it looked so pretty I didn't want to wipe it off! I fear it will drop off before Christmas though.

I am also sharing this with Crafty Hazelnut's Christmas Challenge - Use a sentiment

..... had a very shiny nose....

The reindeer stamp I've used on this card is one of my very favourite Christmas stamps. It was a magazine freebie several years ago - it's so sweet without being fussily cute, and lends itself beautifully to colouring.


Today I've stamped and heat-embossed it, and then coloured it in with Promarkers apart from the nose and the robin's breast, which I have made very shiny using Tonertex pen and cold foil, which you can buy from Foil Play.

The printed paper panel is made using the paper left over from a sheet I printed out for this card and the embossed snowflake panel is done using a Darice embossing folder and Core-dinations card. After embossing, I sanded the pattern lightly and then smooshed a glue pad over the top and sprinkled it with white glitter. I can seldom get sparkle to show up in photos, so you will have to take my word for it, it is actually VERY sparkly.

The sentiment is cut with the Tonic die "Sparkle and Shine" - which sums up the sparkly snowflakes and little Rudolph's Very Shiny Nose!

I am sharing this with:

Jingle Belles - While Shepherds Watched Their Flocks
52 Christmas Card Throwdown - Embossing, Heat or Dry
CRAFT challenge - Christmas
Allsorts Challenge - Sparkle and Shine  
Winter Wonderland - Frosty or Well Wrapped Up
Addicted to Stamps and More - Anything Goes
Perfectly Created Chaos- Anything Goes

Winter or Spring at Always Use Rubber

Thank you to everyone who joined in with our first challenge at Always Use Rubber. Now it's time for our second challenge, and this time our theme is Winter and/or Spring.

We welcome any style, and any kind of craft, not just cards, but we MUST see some real stamp-and-ink stamping on your work - and NO DIGIS.

This time I have used a lovely Creative Expressions stamp set to make a very Clean and Simple card, because I think CAS has a lovely fresh look about it that fits well with the transition time between winter and spring, which is when the first snowdrops start to peep through.


As well as the snowdrop cluster and a wide range of sentiments, the stamp set includes separate stamps for the flower head, making it perfect for 3D work as you don't need to mask off areas of the stamp, or stamp the whole image again a second time, to get those extra layers to use.

I heat embossed the stamping and then coloured the whole thing in with Wink Of Stella - I hadn't used the green one before and I think it is perfect for the snowdrop foliage. And look, I even managed to get a photo of the lovely sheen the WOS gives!


I would like to share this with
Craft Your Passion - Anything Goes
The Flower Challenge - Anything Goes with Florals
Fab'nFunky - Fabulous Flowers
Craft Rocket - Happy Birthday
A bit more time to craft - Anything Goes
Inkspirational - Black and one other colour
 

Friday 21 October 2016

Recipe: Chicken and coconut noodle broth

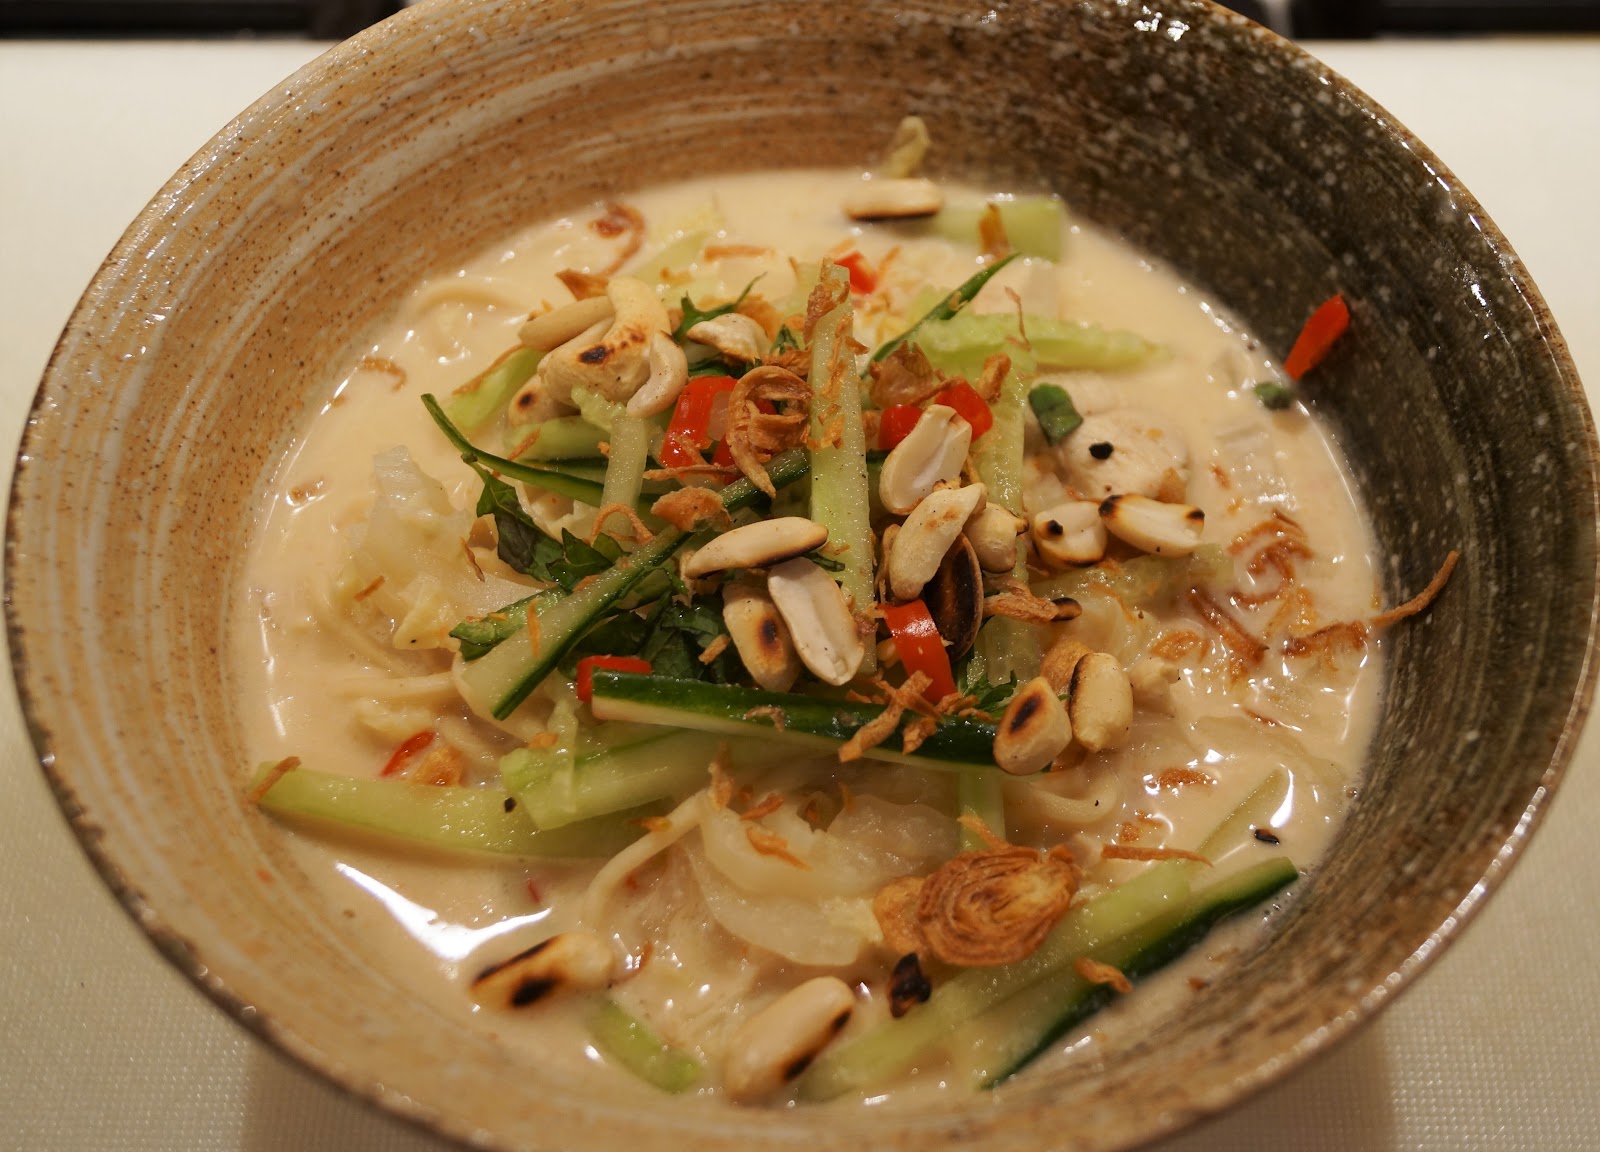
This dish started out as a version of laksa but got sort- of sidetracked along the way. It's a lovely, soothing, comfort food  dish, not quite a soup and not quite a bowl of noodles. The quantity I made was intended to serve two but would easily have served 3-4, especially with a few more noodles added.


You will need:

2 chicken breast portions, ideally with skin and bone
1 x 400 ml can coconut milk
1 x 120g can coconut cream
1 tbs chilli jam
2 tbs light soy sauce
juice of 1 lime
130 g medium egg noodles
about a quarter of a head of Chinese leaves, finely sliced

to finish:
10 cm length of cucumber, cut into slim sticks
2 tbs skinned peanuts and/or cashews, toasted lightly in a dry pan (or use bought dry roasted nuts)
a few fried shallot or onion flakes  - most supermarkets sell them for use as salad toppings or you can buy large jars from Asian stores
1 thinly sliced red chilli, seeds removed
6 leaves of mint or basil, finely shredded

Place the chicken in a saucepan  and cover with water. Cover with a lid and cook gently for about 25 minutes until the chicken is cooked through. Use a slotted spoon to remove it from the pan, leaving the liquid behind in the pan.

Remove the skin and bones from the chicken - they've flavoured the broth now so they've done their job - and slice the chicken meat into spoonful sized pieces.

Add the coconut cream, coconut milk, chilli jam, soy sauce and lime juice to the broth in the pan, bring to the boil and then add the noodles to cook for the time directed on the pack. A minute before they are due to be ready, toss in the shredded cabbage and mix. When the noodles are cooked, reduce the heat to low and return the chicken to the pan. Heat through, stirring, until the chicken is piping hot.

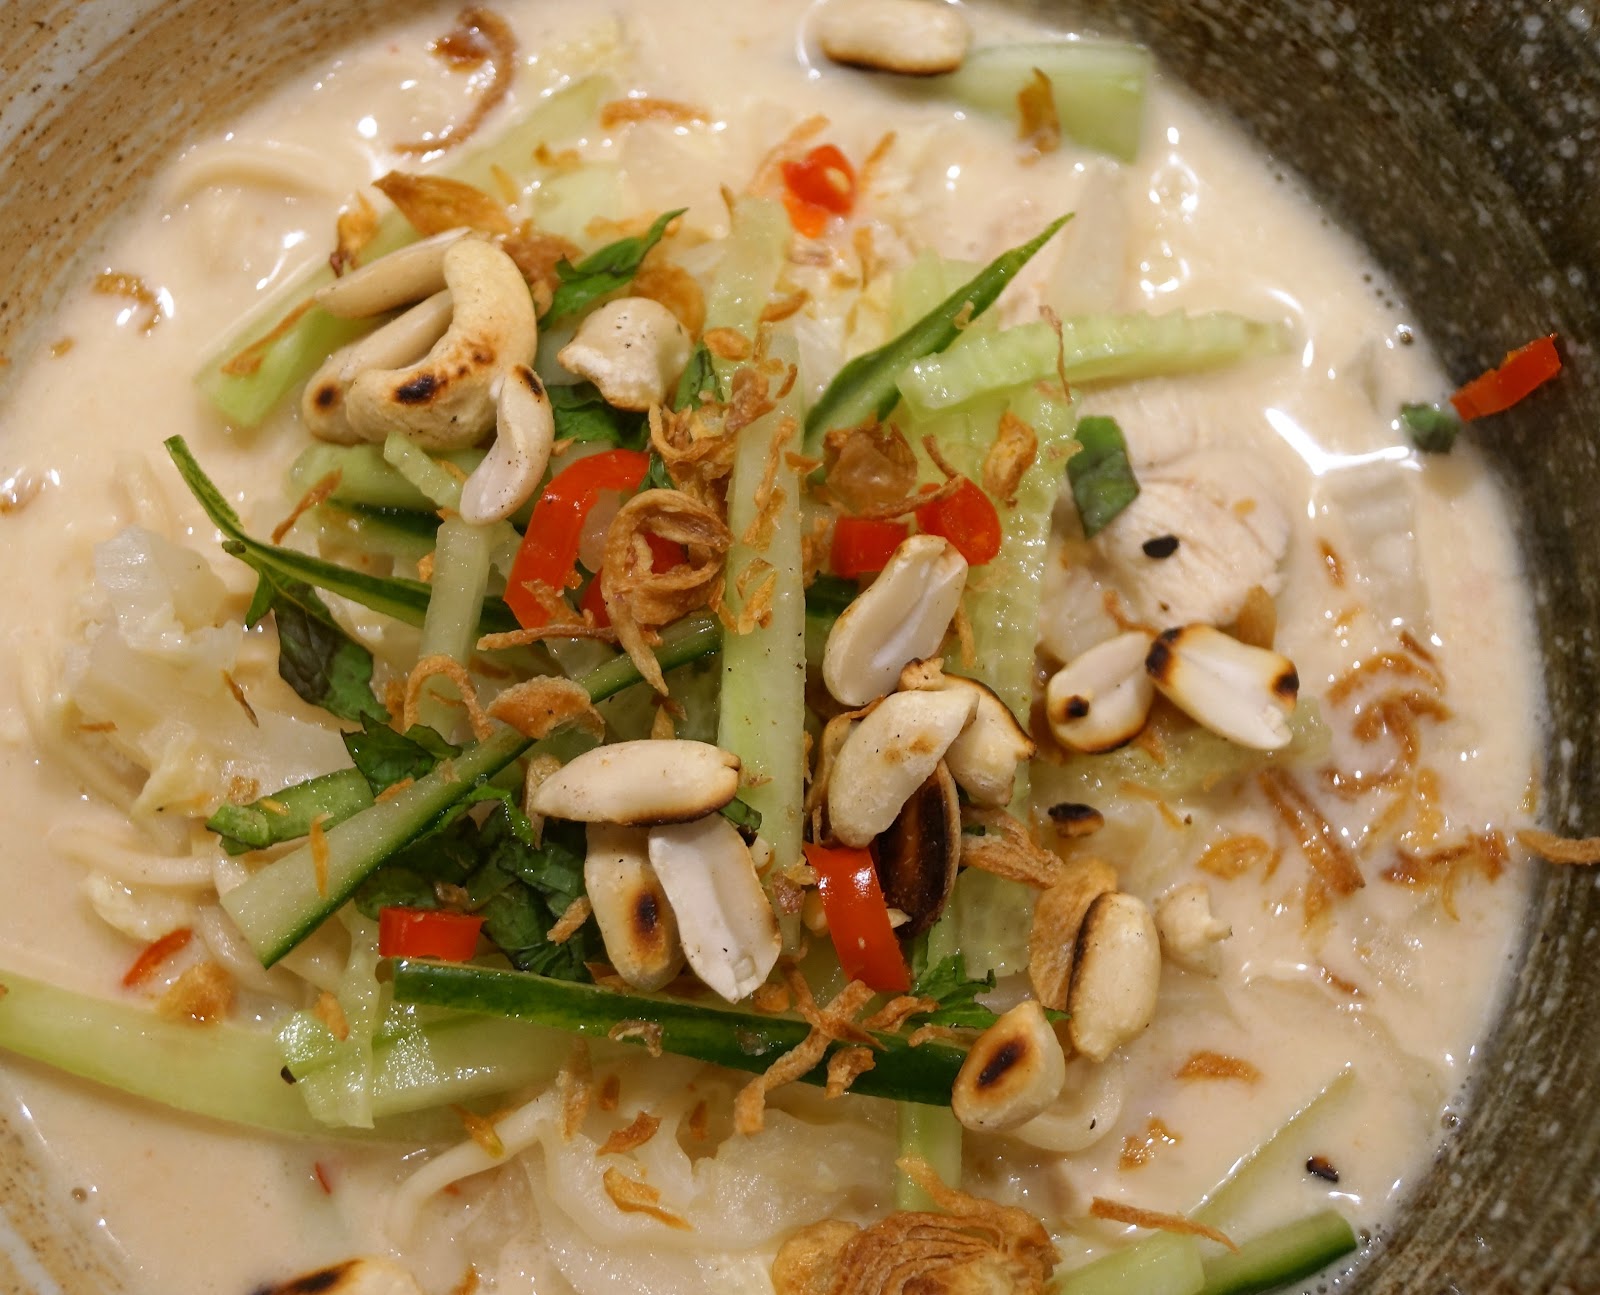
Divide the meat, cabbage, noodles and liquid between large soup bowls and top each portion with the garnishes as shown.

Eat carefully, preferably while wearing plastic overalls and sitting in the bath if your noodle eating skillz are anything like mine!


I'm  sharing this with Cook Blog Share at Easy Peasy Foodie where this week you will find some great Autumn Comfort Food recipes.
CookBlogShare

Tuesday 18 October 2016

Wake up and Smell the Coffee

The current challenges at Addicted to CAS and Casology are both Coffee - I don't have much in the way of coffee related stash, being a tea drinker, but I DO have a fun set of stickers that Darnell sent me which I've used on this card.

For the cup of coffee, I've used one of the stencils that are meant to go on top of a cappuccino to shake the chocolate through. It's in a coffee bean design, and I've used Starlight paint to stencil it on to a scrap of very special card. I bought it at The Eden Project some years ago, and the swirly pattern on it is made with actual used coffee grounds (Fairtrade, I hope!) embedded into the fibres of the card. I thought this was my very last scrap and have been eking it out, but yesterday I was rummaging through my box of card for something else and found one more sheet. Having waxed lyrical about how special it is, I suppose I'll go and check ebay after posting this and find dozens of sellers listing it at about 5p a sheet - but whether or not that's the case, it's special to ME as it's a souvenir of a lovely few days away.

Autumn leaves again

So, we were meant to be on our way to the Cotswolds now but there's been a slight hiccup on the health front and we're still here for now, so I'm back with another make.

Last weekend I tried using peel off waste as a stencil, and this time I've been playing around with using actual peel offs as masks. After all I still have a massive collection of peel offs from my early crafting days, it's about time I put them to some use!

Here is one of my makes. I used the peel off Leaves sticker on plain white card, then sponged Starlight paints in gold, green and rust over the whole thing and removed the sticker. With hindsight, I should have peeled the sticker off while it was still wet - leaving it until the paint was dry meant rather a lot of tweezer action.

Then I took a sheet of Tando die-cut leaves and, while still in the sheet, sponged over them with the same combination of paints before popping them out. Finally I assembled them all into this card.


I am sharing this with Just Us Girls - Rust, Gold and Olive

Halloween or Thank you at Cardz 4 Guyz

This week we have a choice of challenges for you at Cardz 4 Guyz - Boo! for Halloween, or a Thank You card. So if you don't celebrate Halloween, you can still join in! The challenge starts at 09.00 (BST) today, but I'm posting this a little early as I'm probably going to be offline for a day or two.

Although I'm not a big fan of Halloween I still decided to go down the Halloween route, using this sweet vintage topper which is from a set I won in the sadly now-closed Suzy Bee's Blooming Challenge. I don't have a pumpkin die, so I made my pumpkin by cutting 5 ovals with the second smallest die of the Nestabilities small ovals set and layering them together, with a snippet of green for the stalk, and some die cut ivy (a Marianne die) to look like the vine the pumpkin grows on.


I am sharing this with
Glitter 'n' Sparkle - Anything Goes
Cut It Up - Pumpkins
Dies R Us - Fall/Halloween
The Male Room - Halloween

Monday 17 October 2016

Christmas Cuties

The new challenge at CD Sundays is "Paws"  - I was just about to turn to my La Pashe CDs where I know there are lots and lots of cat and dog themed images, but then I decided to have a poke around among some of my less-frequently used CDs.

When I get a CD with a magazine, I tend to use it a few times while the magazine is new, and then stick it on the shelf to gather dust, so I spent an interesting few hours rediscovering images I'd forgotten all about. I finally settled on this image and paper from the Barkley collection on Crafters Inspiration CD #3.


The trouble with it is that the image is HUGE  - it almost fills the front of a large 20cm square card, and it's very hard to be really creative with something that stands alone like that. The design sheet includes some extra images to layer over three of the pictures, and really all that was left to do was add a background, a bit of matting and layering and a few die cut snowflakes.

Sunday 16 October 2016

That left over butterfly.....

OK, a few days ago I promised to share what I made with the left over cyan butterfly that I cut when I made this card - well, it's been looking at me ever since, so today I have finally relelnted and used it, along with the rest of the snippets from the sheet of cyan card and a snippet of checkered paper.


The butterfly and Thank you are Memory Box dies and the layers made with one of the Spellbinders Labels sets (I can never remember which is which)

I'm sharing this card with
Butterfly Challenge - Cyan or Checkered
Pixies Snippets Playground - week 251
Cuttlebugmania - Thank You
Cardz 4 Galz - at least one die

Saturday 15 October 2016

Christmas Cuties

The images and sentiments I've used on this card are some that were sent to me in an image swap - I think they are Lawn Fawn ones from a couple of Christmases ago. The die cut trees were part of the same swap.


I've put them together into a little scene with a snowy sky stamped with snow from the Creative Expressions snowdrop stamp set, a touch of colour on the images and a little Stickles "snow" behind the snowbunnies.

I am sharing this with
52 Christmas Card Throwdown - Christmas Critters
Crafty Hazelnut's Christmas Challenge - Cute or atg

Roasting Chestnuts

Over the last few days, Mark has collected, prepared and frozen around 1kg of sweet chestnuts, ready to use over the Christmas period in stuffings and with Brussels Sprouts. I think he's adding some to a beef casserole tonight too.

I just thought I'd mention that, since the theme of this card is also chestnuts. Although the people are presumably roasting sweet chestnuts, the only chestnut stamps I have are for the leaf and nuts of the Horse Chestnut, or conker. I do hope they aren't planning to eat some of those, or they'll go to bed with tummy ache. And just digressing again, I heard on the news at lunchtime that our Horse Chestnut trees here in the UK are falling victim to a leaf miner beetle so fast that within 15 years there may be none left - our great grandchildren may never know the joy/painful knuckles of a game of conkers.


The topper is one that I won in the now-defunct Suzi Bee's Blooming Challenge, one of a set of reproduction Victorian Halloween cards. Just in case you can't read the text in the photo, it says "I wish we night always roast our Hallowe'en nuts together." Which might not have been quite so much of a double-entendre in Victorian times as it is now - it certainly leaves me chuckling! And for that reason, I am entering it into the Naughty category at Naughty or Nice - Spooky Sisters and Wild, Wild Women.

I dreamed a dream.....

Now, here's a coincidence. Last night I dreamed that I made a card, and I remembered it so clearly that when I woke up, I set to and made it. And then I looked at Less is More and saw that this week's challenge is "Spiders or Insects". And there was my insect themed card, sitting on my craft table, waiting for the Stickles to dry!


The "honeycomb" is made by using peel-off waste from a sheet of hexagons as a stencil and sponging orange and yellow inks  through it. The bee is a very old unmounted stamp which I think came from Raindrops on Roses, coloured with Promarkers and with the wings highlighted with Stickles, and the sentiment is from a Clearly Besotted set of bug-themed stamps.

I am sharing this with
Less is More - Spiders or Insects
Alphabet Challenge - Quick and Simple

A tag for a change

I very rarely make tags - mainly because I'm rubbish and wrapping presents and tend to just scrawl the recipient's name on a sticky label, a lovely tag is wasted on my gist wrapping.

However this stamp, from the Papermania Folk Christmas set, just screams to be made into a tag, doesn't it? So, a tag it has become.


I am sharing this with
Use Your Stuff - Orange, black and one neutral
Christmas Cards All Year round - use some orange (I was worried that a tag might not be acceptable, since the challenge is a card challenge, but I see one of the DT has made  one - phew, I'm safe!)
Mod Squad - Anything But a Card
Crafty Creations Challenges - Not a card

Sisterhood of Snarky Stampers #70 - Day of the Dead

November 2nd is known in some cultures as "The Day of the Dead" and Edna, while nibbling on a sugar skull, has decided we should celebrate it with a challenge at the Sisterhood of Snarky Stampers.


If you've ever visited Mexico, you'll have seen that practically every souvenir shop, from the high end to the tackiest of tacky, is crammed with pottery replicas of the ornate sugar skulls traditionally eaten on the Day of the Dead,  and that's what my card, too, is based on.


The main skull image is stamped and decorated with stamps from the Sheena Douglass "Sugar Skull" set, and the ribbon and buttons came from a Facebook seller called Its Sew Gorgeous. The floral background is made by randomly sponging distress inks over white card, then Versmark resist embossing  with a small floral stamp that was a magazine freebie a few years back. The sentiment is computer generated. As we don't celebrate Day of The Dead here in the UK, I chose a sentiment that would work for a birthday, as long as your friend is close enough to be happy for you to make fun of their age!

I am sharing this with

Classic Design Team Open Challenge - October 
Country View Challenges - All things spooky

Friday 14 October 2016

RECIPE - Harissa chicken with roast veg sauce

If you read Mark's blog, you may have noticed that earlier this week he posted a recipe for the home made harissa that he made.

One of our favourite ways to use harissa is in this chicken dish of mine. Rubbing the chicken flesh underneath the skin with the harissa allows the spice flavour to penetrate the meat and - unlike slashing it as you would with chicken tikka - leaves the skin intact to stop the meat from drying out. In this picture you can just see the red colour of the harissa peeping through the skin of the raw chicken.


After cooking, the skin becomes crisp and brown, with the delicious spices tucked away underneath:


Here's how to make it:

one 1.5 kg  chicken                            
2 tsp Harissa paste                        
2 lemons                                                                    
2 tbs olive oil
1 large carrot                                                             
1 orange-fleshed sweet potato
½ butternut squash                                                    
1 large onion
1 tin chopped tomatoes                                           
salt and pepper
cous cous prepared as directed on pack to serve

 Set oven at 190ºC, 170 fan, gas mark 5.

Loosen the neck flap of the chicken, ease the skin away from the breast , spread the Harissa paste over the breast and press the skin back in place. Put chicken in a large baking dish. Halve one of the lemons and squeeze over the chicken, putting the empty shells inside the cavity. Cut carrot, squash and sweet potato into 3 cm cubes and the onion into 8 wedges. Place prepared vegetables around chicken with the other lemon, cut into 8 wedges. Drizzle the olive oil over everything  and season with salt and pepper. Roast for 1¼ hours or until chicken is cooked, stirring vegetables occasionally.

Remove chicken from roasting tin, stand for 10 minutes and carve. Meanwhile remove the lemon wedges from the vegetables and spoon off as much fat as possible leaving the juices behind. Tip the tomatoes into the baking dish, mixing well with a wooden spoon and crushing any large lumps of vegetables into the sauce. Return to the oven to heat through while resting and carving the chicken.

Serve the chicken and vegetables with cous cous


Spiced Fruit Loaf in the Bread Machine

One of my favourite lunches on a cold day is to top a slice of fruit loaf with a sliced pear and some blue cheese and then toast it. However having bought a jar of pear, date and walnut chutney at a recent chilli festival, I really fancied having a "ploughman's" style lunch but still using fruit loaf, blue cheese ant toasted fruit loaf. As well as the chutney, I added a handful of crunchy walnuts to complement it.


Note my lovely retro "Palissy" plate - one of the last few items left from the set we bought when we got engaged in 1975!

If you have a bread machine, a spiced fruit loaf is the easiest thing in the world to make - and the house smells wonderful while it is cooking.

Place the following ingredients in the machine in the order suggested by your machine's handbook:

1½ cups of water
4 tbs oil - sunflower, rapeseed or light olive
4 tbs dried milk powder
2 tbs caster sugar
1 tsp salt
1 tsp ground mixed spice
½ tsp ground cinnamon
½ tsp grated nutmeg
4 cups strong white flour
1½ tsp dried yeast

Either fill the hopper with 1 cup dried mixed fruit (or mix your own from whatever you have in the cupboard) if you have a fancy machine that adds the fruit at the right time for you, or have the fruit ready by the machine to add when the "add ingredients" beeper sounds.
Switch on to the normal loaf setting and sit back and enjoy the lovely cooking smells!

Thursday 13 October 2016

And now a much more muted Christmas Card

Eyeballs hurting from looking at the card in my previous post? Well you can let them relax now as for this card I've used a much more restful set of neutral brown and kraft shades, using papeers from the Tonic Studios Winter Wonderland pad.


The sentiment topper is die cut from one of the papers from the pad.
Can you imagine the angst that one little button caused me? I have a "thing" about buttons, I always like the holes to be horizontal. But I also have a "thing" about snowflakes (apart from the obvious one that this only has 5 points when all snowflakes have 6) - I always position them with either a point going straight up or a point evenly each side of vertical. But with this button, the holes are slightly skew compared to the points so I couldn't have both. I must have repositioned it about 20 times before I committed it to glue!

I am sharing this with
Winter Wonderland - Kraft and/or plaid
Perfectly Created Chaos - All about 3 (3 papers, 3 shapes, each shape 3 layers - a trio of threes!)

Bright Christmas

I've been making another card from the Papermania Folk Christmas set. It's a useful set for quick, bright cards but the colours in it aren't really me.


I think I might pass the remainder of the set on to the grandchildren as I'm sure they will be making lots of cards in the run up to Christmas.

In the meantime, this card, which is so lurid it made me go "gah" is going to be shared with:

Jingle Belles - Pink Christmas (Gah!)
Crafty Hazelnut's Christmas Challenge - Turquoise -a little or a lot
Glitter and Sparkle - Think Pink